Building an Amazon Product Price Deflation tracker using Beautiful Soup 4 and Python
Hello people. In this article i will be doing a brief introduction to web scrapping and how it is used. Then we will be taking a detailed look into a simple tutorial using the Beautiful Soup 4 library of Python on how to keep a track on a desired product's deflation in Amazon. This might prove useful if you're mid level broke and keep on checking on that one game or something you've really be wanting to buy everyday , idk xD.
What is Web Scraping Exactly ?
If you’ve ever copy and pasted information from a website, you’ve performed the same function as any web scraper, only on a microscopic, manual scale.

Web Scraping, also known as web data extractor is the process of retrieving data from a website that you want. Unlike the boring and repetitive task of extracting data manually, web scraping uses intelligent automation to retrieve hundreds, millions, or even billions of data points from the internet’s seemingly endless frontier.
Companies use web scraped data to enhance their operations, informing executive decisions all the way down to individual customer service experiences.
For a brief overview it can be used in the below ways :
Scrape product details (price, images, rating, reviews etc.) from retailer/manufacturer/eCommerce websites (Ex: Amazon, eBay, FlipKart, Alibaba etc.) to show on own websites, to provide price comparisons, to perform a price watch on competing sellers etc.
Scrape contact details of businesses as well as individuals from yellow pages websites
Scrape people profiles from social networks like Facebook, LinkedIn etc. for tracking online reputation.
Scrape articles from various article/PR websites to feature in own website
Scrape anime based on genre is a cool one I am working on right now.
So yeah maybe you can scrape hashnode if you want to xD, play around yes.
Prerequisites :
- Decent knowledge of Python
- A little knowledge on HTML elements
Step 1 : Importing the libraries
First we need to install the following libraries requests and beautiful soup 4
$ pip install requests bs4
Requests orrequests allows you to send HTTP/1.1 requests more conveniently. There’s no need to manually add query strings to your URLs, or to form-encode your POST data. Keep-alive and HTTP connection pooling are 100% automatic, thanks to urllib3.
Beautiful Soup 4 or bs4 is a python library that makes it easy to scrape information from web pages. It sits atop an HTML or XML parser, providing Pythonic idioms for iterating, searching, and modifying the parse tree. In more simple terms, it has some really cool methods that help us find the different elements in our website and scrape from them in a more organised manner.
In order to actually ''track' the price, we need to be notified when the price drops. So for that we will be building an email notification system, that will send a mail when the price for the product drops below our desired mark. For this purpose we will be using the smtpliblibrary . In very simple terms it creates a client session that sends an email to any internet machine.
After all that's done, import them :
import requests
from bs4 import beautifulsoup
import smtplib
import time # This will be used for resting an infinite loop so the product is consistently being tracked.
Step 2 : Getting the URL for our product
Now we define the URL for the website of the product that we want to track.
URL = 'https://www.amazon.in/Acer-15-6-inch-Graphics-Obsidian-AN515-54/dp/B088FLW4TW/ref=sr_1_1?crid=2H41SHLUNLX4C&dchild=1&keywords=acer+tuf+gaming+laptop&qid=1596998484&sprefix=Acer+tuf+%2Caps%2C368&sr=8-1'
Step 3: Defining headers with your User-Agent :
When your browser connects to a website, it includes a User-Agent field in its HTTP header. The contents of the user agent field vary from browser to browser. Each browser has its own, distinctive user agent. Essentially, a user agent is a way for a browser to say “Hi, I’m Mozilla Firefox on Windows” or “Hi, I’m Safari on an iPhone” to a web server. The web server can use this information to serve different web pages to different web browsers and different operating systems.
For the value for the key User-Agent we go to google and type in the following :

Now we define a variable called headers and initialize it with a dictionary and paste our user agent as a value for the key User-Agent
headers = {"User-Agent" : 'Mozilla/5.0 (Windows NT 10.0; Win64; x64) AppleWebKit/537.36 (KHTML, like Gecko) Chrome/84.0.4147.105 Safari/537.36'}
Step 4 : Defining our price checking function :
This is the prime function that will check the price of our product.
def check_price():
The code following this will be inside of check_price().
First we need to create a variable for our page and get it's contents by using beautiful soup.
    page = requests.get(URL, headers=headers)
    soup = BeautifulSoup(page.content, 'html.parser')
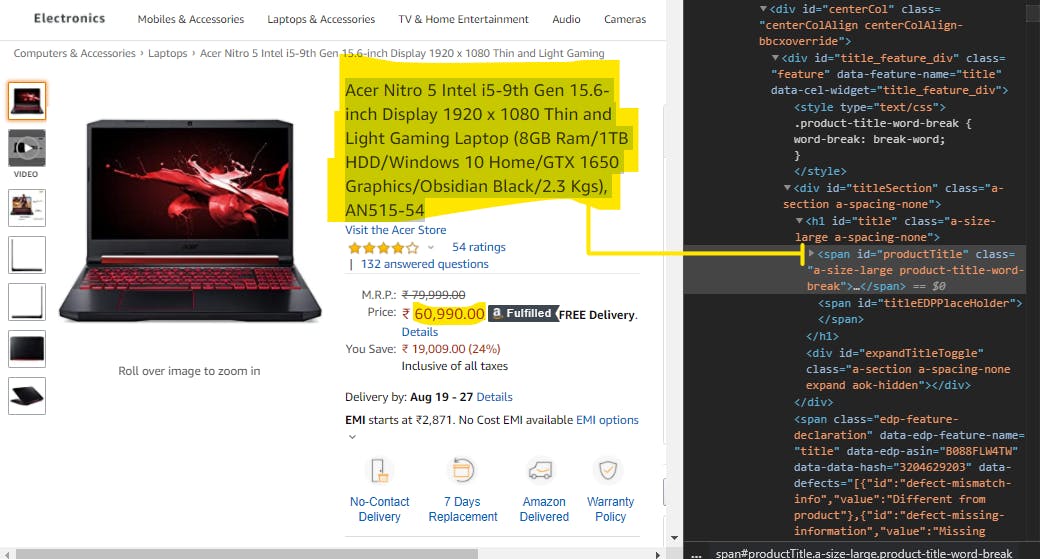
Now we extract the title and price using the BEAUTIFUL! soup method find.
We pass the id of the HTML element we require from the browser. Just right click and inspect in case you don't already know about it.

    title = soup.find(id="productTitle").get_text()
    price = soup.find(id="priceblock_ourprice").get_text()
    price2 = price.replace(',','.')   #We replace the commas of price string with dots so that the price string can be converted
    converted_price = float(price2[2:8]) #We slice out the special symbols and convert into a float for comparison
For getting the output we intentionally set our given price higher than the mentioned price so that we receive the email
    if(converted_price < 65.0):
        send_mail()
    print(converted_price)
    print(title.strip())
This marks the end of our check_price() functionality.
Step 5 : Sending the EMAIL !
Here we build our own smtp server for sending the email when the product price falls down.
def send_mail():
First we set up the server using the smtp module.
    server = smtplib.SMTP("smtp.gmail.com",587)
    server.ehlo() # Used to identify yourself to an ESMTP server
    server.starttls() #STARTTLS is an email protocol command that tells an email server that an email client, including an email client running in a web browser, wants to turn an existing insecure connection into a secure one. Google it
    server.ehlo()
Next we get our server login for smtp.
- For this we need to have 2-step verification set up with our google account.
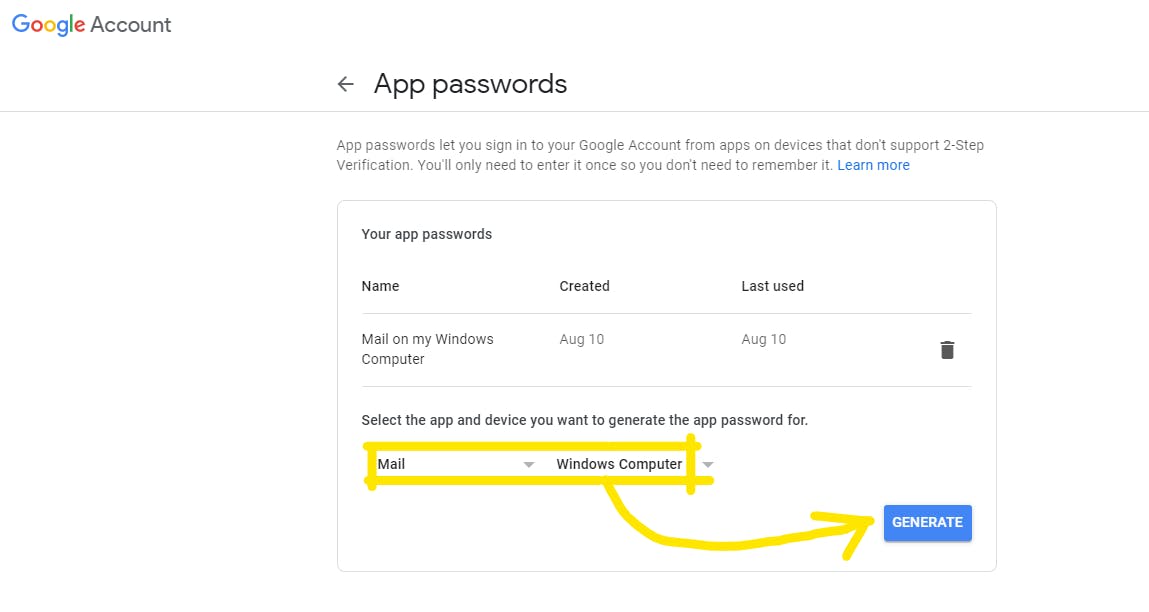
Once that is done, go to Google App Passwords and go to the next step.
Set up your app as mail and device as whatever you are executing on and click on Generate.

This creates a 14 digit-login password.

- Copy it next to your email id as arguments for login.
server.login(`youremail@gmail.com','brwjfudpancyewtz') Now we write the subject and the body for our email and close the server.
  subject = ' Price fell down !'
  body = ' Check the amazon link https://www.amazon.in/Acer-15-6-inch-Graphics-Obsidian-AN515-54/dp/B088FLW4TW/ref=sr_1_1?crid=2H41SHLUNLX4C&dchild=1&keywords=acer+tuf+gaming+laptop&qid=1596998484&sprefix=Acer+tuf+%2Caps%2C368&sr=8-1  and ring your father up right now! this is f** amazing' # really

  msg = f"Subject: {subject}\n\n{body}"
  server.sendmail('youremail@gmail.com' ,msg)
  print('EMAIL SENT !')
  server.quit()
We close our send mail function here.
Step 6 Infinite Loop :
Finally set the driver code inside a while loop and keep sleep for it every 1 hour.
while(True) :
    check_price()
    time.sleep(60*60)
Now we run our code :
If we see the EMAIL SENT! output in our console, our scrapper was executed successfully for testing. It does not necessarily need to show EMAIL SENT ! every hour though. Because of course the price do not deflate that fast.
If the price does deflate we will get the email in this format :
 To hell with my censorship but you get the point. It works.
Conclusion :
Play around with this, make better email bodies than the boring and lazy one I did. And suggest more interesting web scrapping ideas in the comments below and interesting projects you can think of with this amazing tool, or maybe even build a web scraper on your own, I might try a series on that one day. Signing off, like and share if you found this useful.
